

Thank you for viewing this article of DHCP. In this article, you have been given complete information about DHCP (Dynamic Host Configuration Protocol ) which you will be able to understand easily.
Table of Contents
DHCP Topic Covered
- DHCP Server for Window 10
- How to Change DHCP Lease time Window 10
- What is DHCP Lease Time?
- What is DHCP?
- Why DHCP is used?
- How to DHCP Works?
- How to Fix DHCP Is Not Enabled for Wi-Fi
- How to change IP Address Windows 10
DHCP Server for Windows 10
Required Software for DHCP Server for Window 10
For this, you will have to download and install RSAT Tools (Remote Server Administration Tools) in your Windows 10 computer. You have to install another software called Administrative Template.
This software helps you to remotely manage the roles and features of the window server. This software only helps the window server to manage remotely, for this you should have a window server in your network.
If you want to create a window server, then you have to install the window server OS on your computer instead of Windows OS.
You can find this tool easily on Microsoft’s website, you can download it from it. Or you can download it by clicking on the link below.
RSAT Tools: – https://www.microsoft.com/en-in/download/details.aspx?id=45520
Administrative Template: – https://www.microsoft.com/en-us/download/100591
Steps of DHCP Server Configuration for Window 10
- After downloading and installing this tool, restart your computer.

2. After restarting the computer, now you have to open the window feature by going to start Manu and typing the Turn window feature on and off.
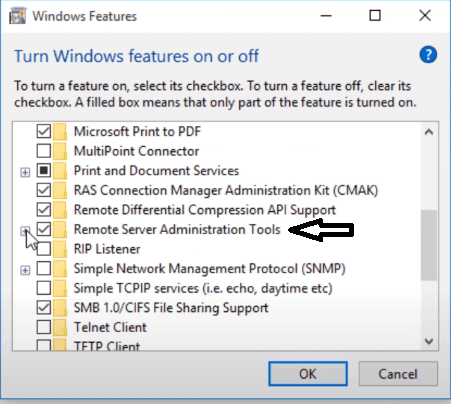
3. You have to tick Remote Server Administration Tools like the photo above. And it has to expand and tick all the features inside. Then click on ok.
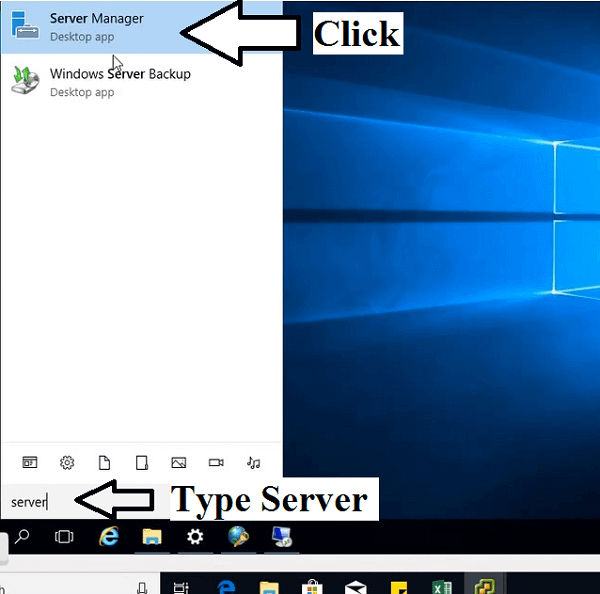
4. Now you have to go to Start Manu and type Server Manager. And open the Server Manager.
5. Now the server manager window will open in front of you.
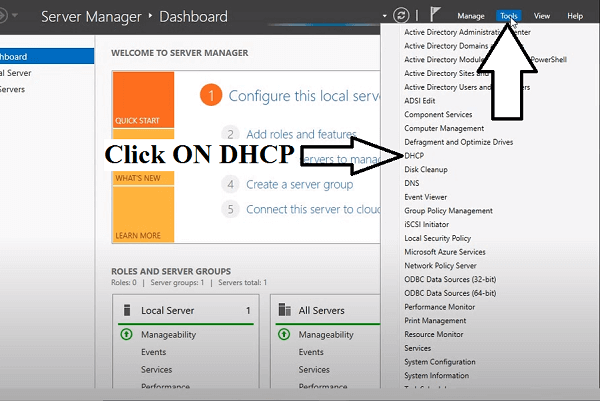
6. Tab on the tools on the right side of the window server. After that, the list of all tools will come up and click DHCP in it.
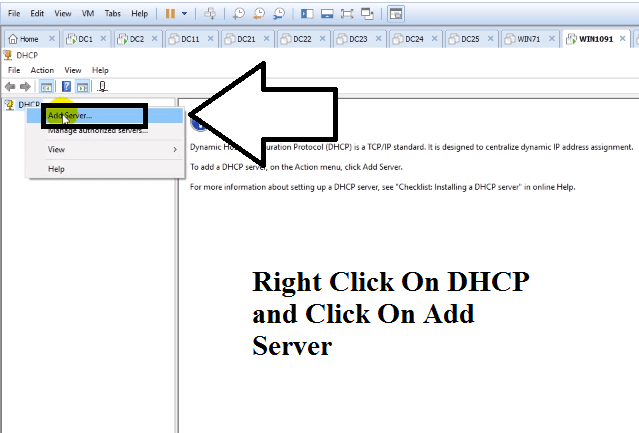
7. After DHCP opens, now you have to right-click on DHCP as mentioned in the photo above.
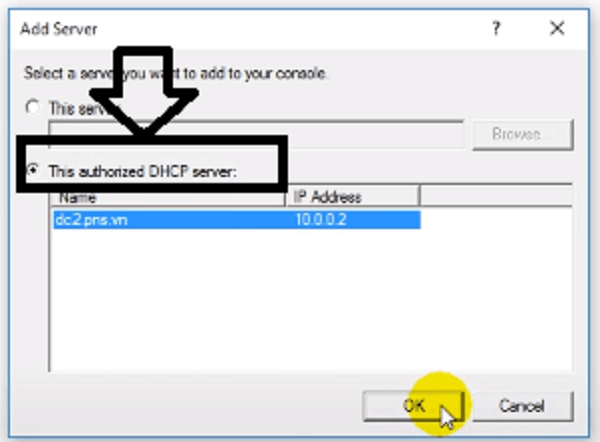
8. Now you select it on “This authorized DHCP server”, and then click on Ok.
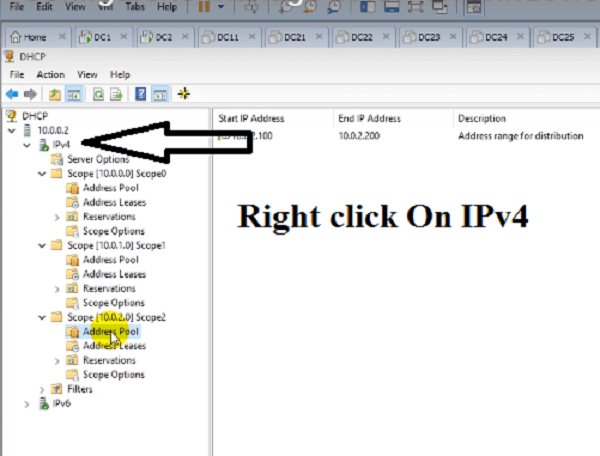
9. Now the screen will come in front of you like the photo mentioned above, now right-click on IPv4 on the left side of this screen.
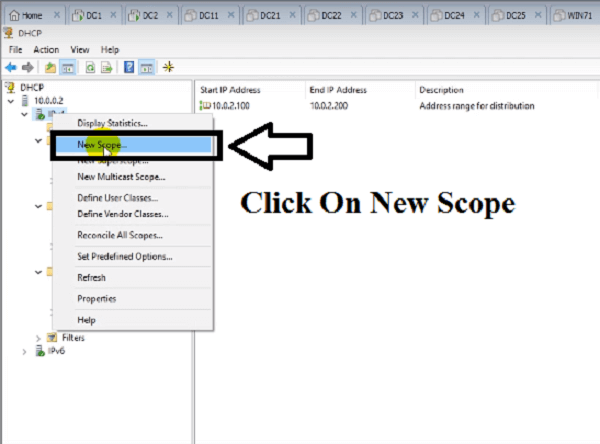
10. After right-clicking on IPv4, click on New Scope.
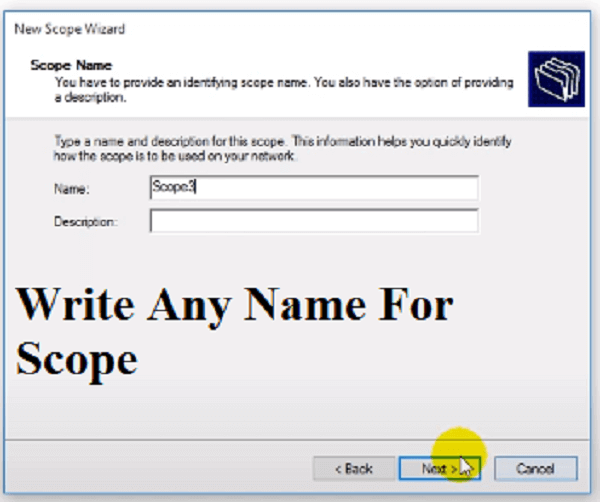
11. Now you can write the name of the scope, you can write whatever name you want. Then click on Next.
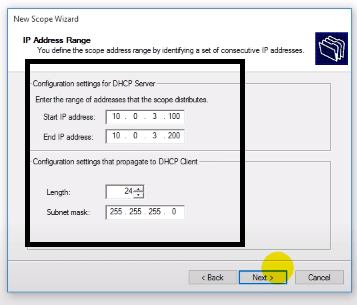
12. Now write the range of the IP address of your client’s HUB or computer that you want to give, as mentioned in the photo above. Then click next.
For example, the Start IP address is 10 .0 .3 .100 and End IP address is 10 .0 .3 .200. Means your client will get the IP address between these two IP addresses. Like 10.0.3.101 to 10.0.3.199.
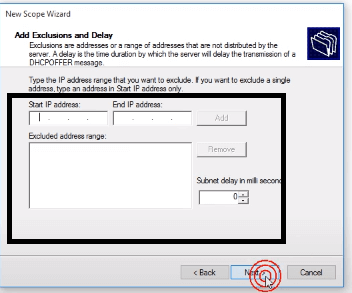
13. The IP is added to the excluded IP address that you do not want to give to your client. Here we will keep it blank. Then click next.
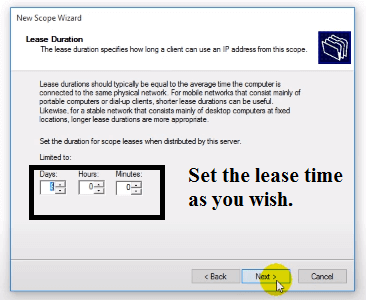
14. Here you can enter the DHCP lease time of the DHCP server according to your own. Generally, it lasts for 8 days. Now click next.
15. Here you will add your computer’s static IP address. Keep in mind that the IP address you have put in the IP address range, your computer should also have a static IP address of the same series.
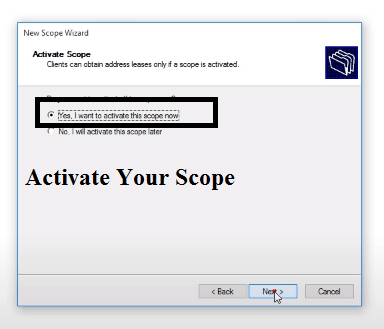
16. Now activate your created scope.
17. Now DHCP server is completely configured on your computer.
How to Change & Check DHCP Lease time Window 7,8,10

- First, open the window server. If there is any problem in opening it, then please check as mentioned in the above steps.
- Tab on the tools on the right side of the window server. After that, the list of all tools will come up and click DHCP in it.
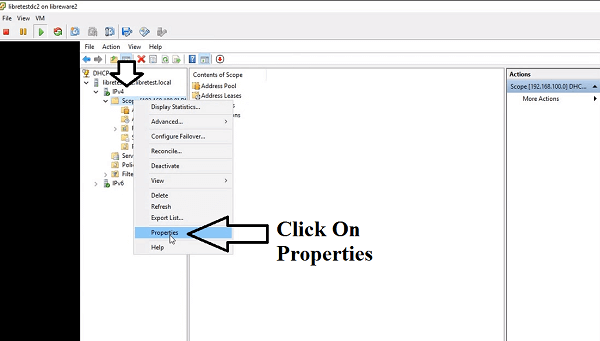
3. Now DHCP window will open in front of you, in that you have to go to the properties of the scope as mentioned in the photo above. Here in DHCP, there is a file named Scope. For this, you will see this configuration file by expanding DHCP and IPv4 written on the left side on your screen. The configuration file name in your computer can be something else, here the scope is named. You have to open the properties of the file named under IPv4.
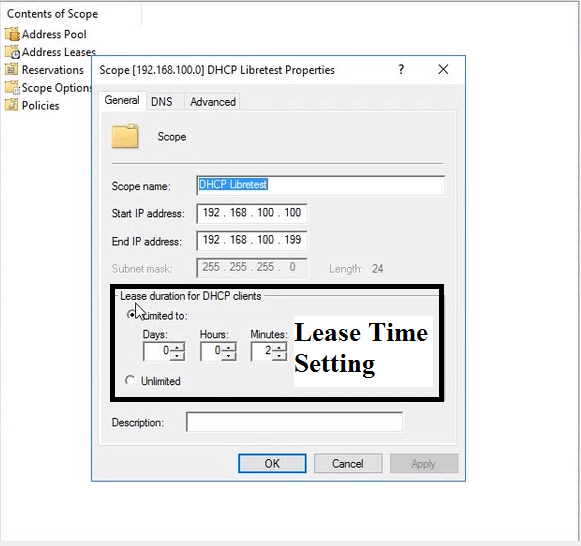
4. This will open the lease time setting in the opened properties, which you can Change & Check DHCP lease time based on your requirement. Then click on Ok.
What is DHCP Lease Time?
For example, in any Server DHCP lease time is 8 days and if a computer is connected to this DHCP then DHCP will provide an IP address to this computer. And that IP address will be fixed for that computer for eight days.
What Happens when DHCP lease time Expires: – After this, the IP address of this computer will be reassigning by DHCP after eight days. If the DHCP server fails between 8 days, then another DHCP can give the IP address accordingly.
Another benefit of DHCP Lease time is that if a visitor came to an office or company and connected his laptop to this DHCP and DHCP would give an IP address to that laptop. And this IP address will be fixed for that laptop for eight days.
Now if that visitor leaves then DHCP will check after eight days and he will give this IP address to someone else if IP address is not used.
In this way, DHCP manages IP address completely and automatically gives IP address to the device connected to DHCP network.
What will happen with DHCP lease time forever? – You can set the DHCP lease time to a maximum of 135 years. But with this setting DHCP will not change the IP address of any client for 135 years.
And it has one disadvantage. If DHCP gives an IP address to any client and even if that client does not use this IP again, this IP address will be fixed for that client for 135 years and no one will get this IP address. This will increase traffic to the DHCP server. Hence keeping the DHCP lease time short.
What is DHCP?
The full form of DHCP is the Dynamic Host Configuration Protocol. This is a network protocol used in networking.
A DHCP server uses in wired and wireless IP networks and it works on a client-server basis. Some service providers or some servers use this protocol. And service requester or clients also use this protocol.
DHCP server gives a different type of IP Network configuration data, such as a user IP address, subnet mask, default gateway, Domain name, DNS server address, Wins server address, etc.
The DHCP server works on a Client-server model and its works at the Application Layer. DHCP IP address range is called Scope. DHCP is Dynamic Boot P.
It uses UDP (User Datagram Protocol). It does not work on TCP / IP. The DHCP server uses UDP port 67 and UDP port 68 is used by the client at Transport Layer.
Prior to DHCP, IPs were allocated from Boot P to the client’s device, but in this, the MAC address of the client’s device has to be manually entered into Boot P. But DHCP is fully dynamic, it provides IP by taking the MAC address of the client’s device by itself.
Why DHCP is used?
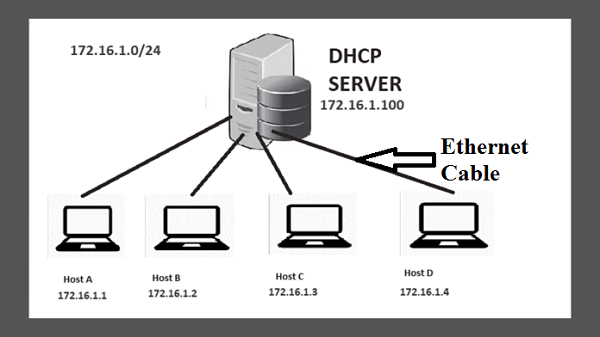
For example, in a small area, we have 10 computers and we have to communicate between 10 computers. For this, we connected everyone to a centralized Ethernet switch with an Ethernet cable.
Now to get communication between everyone, for this, all computers have to set IP. For this, all computers will have to manually enter the IP. All computers have to set IP from the properties of TCP / IP. All 10 computers will have to be set up individually and after that, you can get communication done between all computers.
But you have 100 or 200 computers and you have to communicate between all those computers to go to all the computers and set the IP which will be very difficult and time-consuming. And with so many computers, there is a possibility of a mistake in manually entering IP.
DHCP is used to remove this entire problem. DHCP has to be configured only once. After that it will automatically or dynamically set IP in all computers, you will not need to manually enter. After this, you can have communication between all computers.
DHCP server you can create any master computer, it will continue to provide IP to all devices. Or the DHCP facility is also in the router. All devices will receive IP through the router and it is also configured with a Net-Pad so that the device now gets IP as well as Internet service.
The ADSL router also works on DHCP. This is a normal router from which you use the internet at home or in the office. In this router, the DHCP service is configured and Provides IP to all devices connecting with it. This router acts as a DHCP server and provides IP to some limited devices.
How to DHCP Works?
DHCP follows 4 stages to assign an IP address to any client. These stages are often abbreviated as DORA for discovery, offer, request, and acknowledgment. This is explained in an easy way below all the Stages.
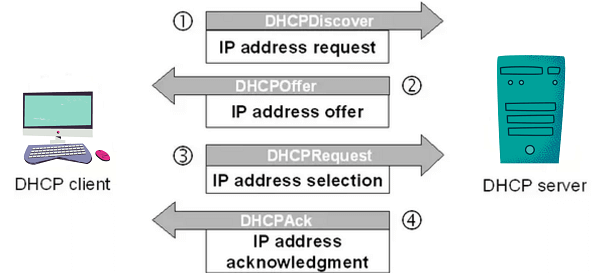
- First, a client’s device is connected to the DHCP network wireless or wired, and then the client’s device sends a DHCP Discover message to the DHCP server. This message is a broadcast packet sent by the network to which the device wants to connect. This message is a request to receive IP that the DHCP server receives. The device sends this Discover request via UDP port 68.
- After the DHCP server receives the client’s Device IP request than the DHCP server offers this Device an IP number.
- Now this Device will receive the IP number offer from DHCP server, after that this Device will accept this offer and send a Request message to the DHCP server.
- After the DHCP server receives the request message, the DHCP server will send an IP Address Acknowledge message to the client’s Device for confirmation.
- And finally, the client’s Device will get the IP so that it can connect to the Device network and communicate with the rest of the Device or from the internet.
How to Fix DHCP Is Not Enabled for Wi-Fi
If the DHCP is not enabled for wifi in your computer and you are facing any difficulty in using internet service due to this, then follow the steps given below.
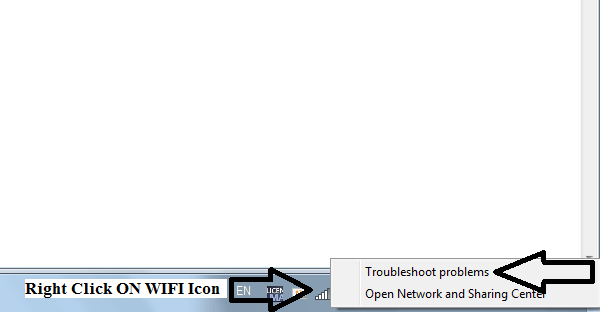
- First of all, you have to right-click on the Wi-Fi icon on the right side of your computer screen and click on troubleshooting.
- After that, the window network diagnostics will open and search the problem.

- After searching the problem, DHCP is not enabled for Wi-Fi written in the problem found list.
- Now to fix this, click on Try these repairs as an administrator below this problem.
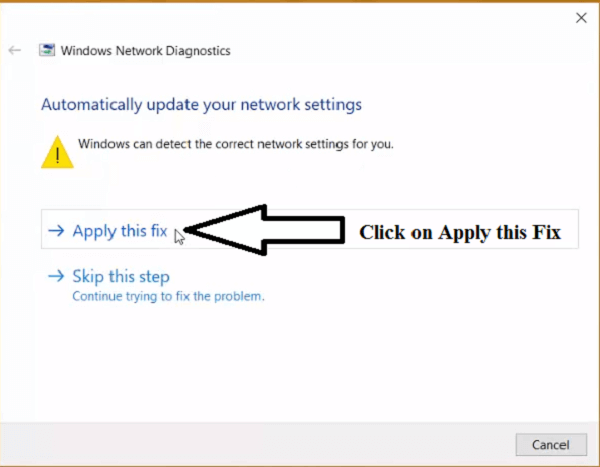
- Now after the problem resolving process, the screen mentioned in the photo above will be open in front of you, now click on Apply to fix.
- After this, the computer will take some time to fix the problem and after that, the problem will be fixed.
Now the problem of not being able to enable DHCP in your computer is solved, now How to DHCP is Enabled for Wi-Fi or How to Enable DHCP on windows 10, How to Change IP Address Windows 10. The solution to all these is given in the steps below. See all steps.
- Now the properties under your connected Wi-Fi name will be written and click on it and go to its properties.
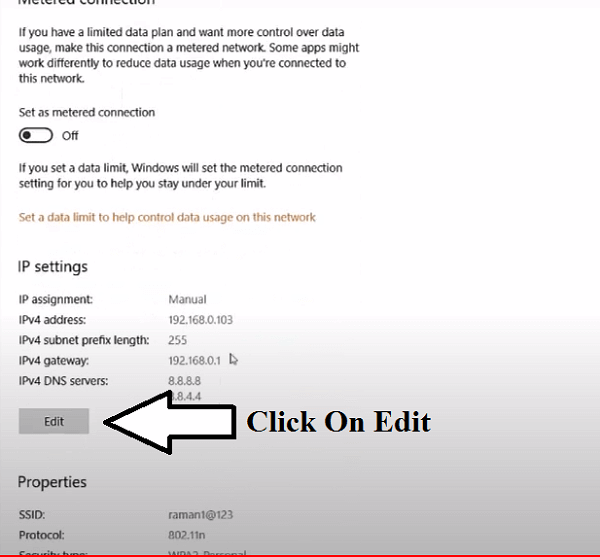
- After the properties are open, click Edit below in the IP settings.
- There will be two options under Edit IP setting Automatic (DHCP) and Manual you have to select on Automatic (DHCP).
- Save the changes made after this.
- Now you open the control panel and click on view network status and tasks.
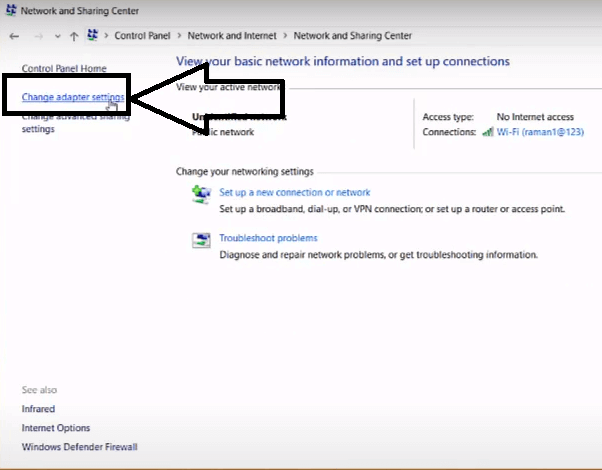
- After going into network status and tasks, click on the “Change adapter setting” written on the left side of your screen.

- Now different types of networks will appear in front of you, right-click on Wi-Fi and click on its properties and go to its properties.
If you connect the computer to an Ethernet cable instead of Wi-Fi, you will open its properties by selecting the Ethernet Network on the left side of the Wi-Fi network mentioned above. And the rest of the steps will remain the same.
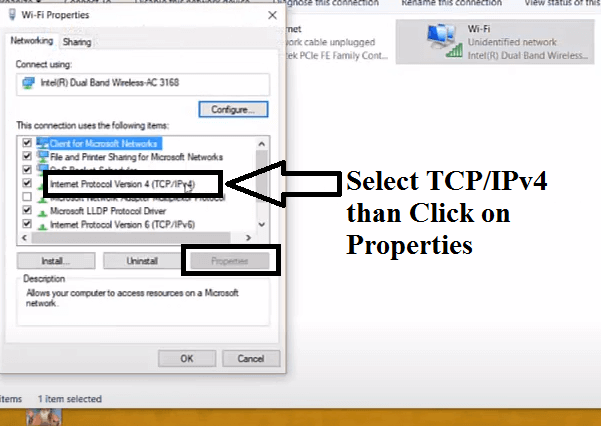
- After opening the properties, you have to first click on the “Internet Protocol version 4 (TCP/IPv4)” as mentioned in the photo above and then click on the properties buttons below.
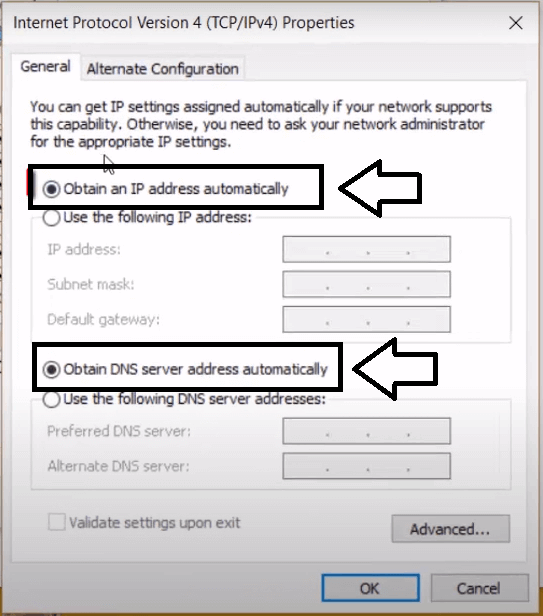
- According to the photo mentioned above in these properties, “Obtain an IP address automatically” and “Obtain DNS server address automatically” must be selected. If not, then do this setting.
How to change IP Address Windows 10
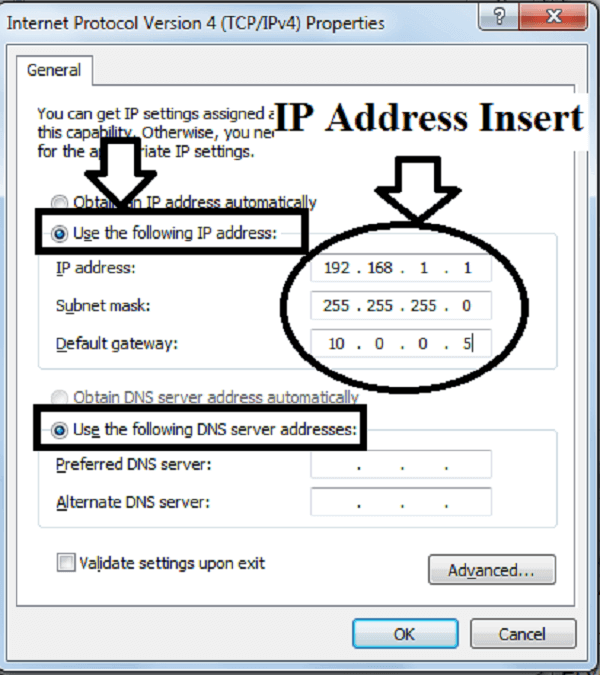
- If you do not want an IP address from DHCP and you have to enter a personal IP address on your computer, then you have to follow all the above steps but make some changes in the last steps.
That change are mentioned in the photo above, instead of selecting “Obtain an IP address automatically” and “Obtain DNS server address automatically”, you have to make a selection on “Use the following IP address” and “Use the Following DNS server addresses”. And as mentioned in the photo above, all the details of IP have to be entered in the highlighted circle. In this way, you can change IP Address window 10.
Hopefully, you have got all the information about DHCP. Now you will be able to easily change DHCP lease time windows 10, DHCP enabled for Wi-Fi & Ethernet, etc.